At Woogloo we know how vital it is that you, the site owner, have the tools and the knowledge to update and edit your own site whenever it suits you. Therefore we have created a set of on-line help files especially for you. These files along with your initial training provided by either your reseller or our Woogloo support team will empower you to truly have complete control over your website.
Following is a brief overview of the basics, by reading through these you will see how easy it is to edit, add pages, add images, and customise your site to your liking.
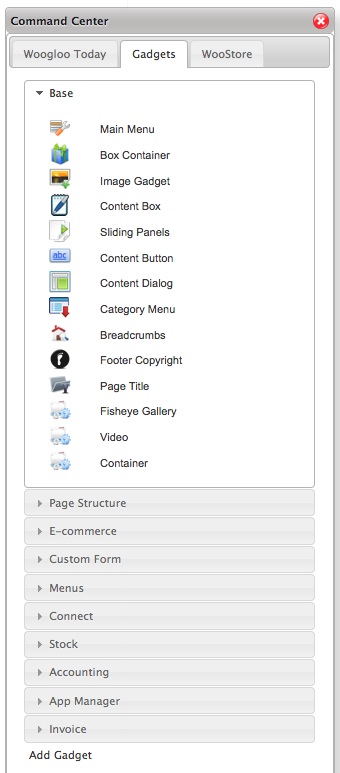
Your Woogloo V3 Website is made up of different Gadgets. Gadgets are the smart objects that are used to make every part of your Web pages or Applications. They are the building blocks for V3. Any and all gadgets can be added to your site by simply selecting it from the gadget window and dragging it on the page you want it.
All the Gadgets are editable and can be changed to suit. This is simply done by right clicking on the different Gadgets and then the Edit Options Menu comes up, select edit window opens up with different editing options.
The most important thing to remember is that if you make a change, edit, add or remove something – you can undo that change using the History control. As long as you have not logged out.
NOTE: Remember that you MUST save changes.
Editing Content
-
Double-click on the content you want to edit and start typing
-
An editing tool bar will appear above the Gadget you are editing.

You can move this tool bar and place it on the page wherever it suits you by simply dragging it with your mouse.
-
Make changes.
-
Save changes by pressing the Save Changes icon
 on the toolbar.
-
Note – depending on your browsers settings – if you do not see the change you have made, try refreshing the page. This may be an issue with your browser or anti-virus software, contact your reseller or Woogloo support for assistance.
-
If you want to view the page how the general public will view it – press and hold the ‘esc’ key on your keyboard.
Make sure you paste any text from any other place (Oher web page, Text editor on your computer etc) to the website using the paste as plain text button. This will ensure that you do not copy malicious code into your website's page. 
Undo Changes
-
To un-do changes – A history box will pop up after you press save changes
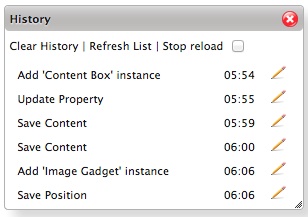
-
Click on the “pencil image” – this will revert the page back to what it was before you made that change.
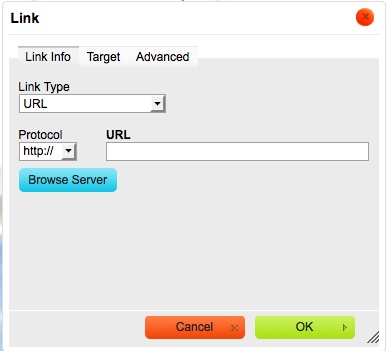
Linking
-
Linking – (if you want an image or word to link to another page of your site, or another Website)
-
For Linking Words -Go into Edit mode
-
Highlight word/s to be linked
-
Select the world image
 To link to a page on your Website
-
An editing box should appear
-
click Protocol and select 'other'
-
Type in the 'URL' box the page URL followed by .html – e.g about-us.html
-
Hint – check the page URL name in the address bar or see Page > Page properties on the page you are linking to for the correct pageUrl.
-
Click 'ok' and then Save changes.
To Link To Another Site
-
Click Protocol and select 'http://'
-
Type or paste the link in the URL box.
-
Click 'ok' then Save changes
To Link Images
-
Right Click on the image and follow the same process as linking words.
-
Click 'ok' then Save changes.
Images
-
Images can now be stored in a filing system (much the same as files on your computer)
-
To view the current images you have on the server, Mouse over the edit menu on the main toolbar at the top of page and
Select site resources
-
A new tab will open and you will now be able to see all of your images, pdf files etc
-
You can rename, add, and manage your folders
-
To rename or delete– right click on the folder

-
To add a new folder – click new folder at the top of the page
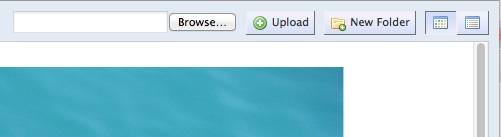
Inserting Images Within The Content Area.
-
Make sure you have resized the image to be inserted first - see Resize an Image
-
Go to edit mode – double click on the content to edit – as per step 1, editing content
-
Put your cursor where you want the image
-
Click on insert image button

-
Click browse server
-
To use images from your computer click browse
-
Select an image on your computer
-
Click open
-
Click upload
-
Click ok
-
Click on needed image
-
Click select
-
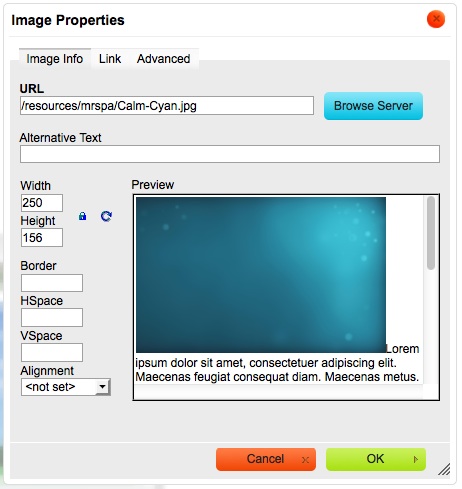
Change settings to suit, width, height, alignment
-
Click ok
-
To use images that have previously been stored on your server
-
Skip step 5-9 and continue from 10
-
Click 'ok' then Save changes
Image Gadget
-
In the Gadgets window
-
Click and drag the image gadget onto the page.
-
Right click the gadget this will bring up your editing menu

-
Click Move/resize and place the image Gadget where you want it
-
Right click the gadget again and select save position
-
To Insert an image, right click and select edit
-
In the editing Gadget that will pop up click inside the image box then follow the steps from step 4 in Inserting Images Within the Content Area.
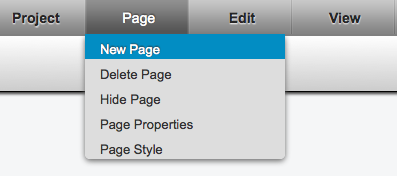
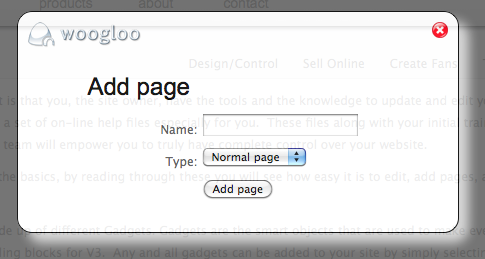
Adding Pages
NOTE: You can add main or sub menu pages. A main menu page is like a home or contact us page. A sub menu page sits under a main menu page.
To add a main menu page
-
Go to the home page
-
Mouse over the page option in the main menu and select new page
-
Name the page and avoid duplicating page names.
-
Click add page
To add a sub page
-
Go to the page that you want to add a sub menu page to (this page will be the parent page)
-
Mouse over the page option in the main menu and select new page
-
Name the page and avoid duplicating page names.
-
Click add page
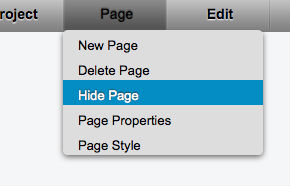
Hide / Show Pages
To hide a page
-
Go to the page that needs to be hidden
-
Mouse over the page option in the main menu and select Hide Page
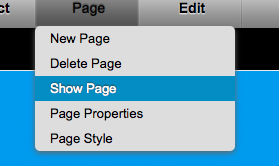
To Show a hidden page
-
Mouse over the view option in the main menu
-
Mouse over hidden pages and select the page needed
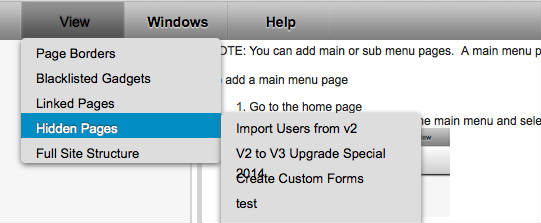
-
Once the page is loaded mouse over the page option in the main menu and select Show Page
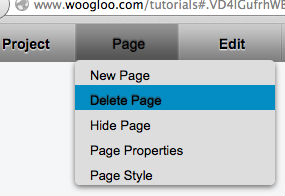
Delete / Remove Pages
NB: This action cannot be undone!!
To Delete or Remove a page
-
Open the page that needs to be deleted
-
Mouse over the page option in the main menu
-
Select Delete Page
Applications
If you do not have an Application and would like to buy it;
-
Click on WooStore tab on the Command Center window.
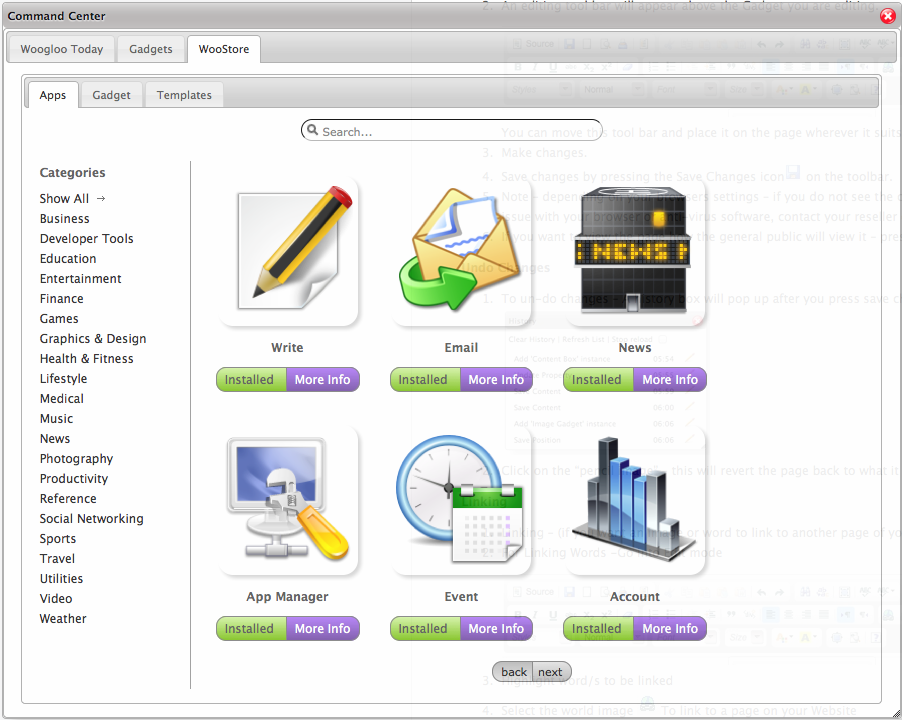
-
Shop for what you want – please note you will using your credit card previously stored to pay your hosting fees on the system to pay for this. If you are NOT using your credit card to pay for your hosting fees – contact your reseller
-
Click on the buy now button and buy the Application
-
When you refresh the window you will now see your Application button on the bottom of the page
For assistance and advice we recommend you contact your reseller or Woogloo Support.
Moving a Gadget
To move a Gadget
-
Right click the gadget you want to edit. It will now have a purple box around it.
-
Select move/resize. No grid is the easiest option.
-
The gadget will now have a blue box around it
-
Click and hold inside the Gadget (blue box) and move it to the position you want.
-
Right click the gadget and mouse over save position & dimensions and select save instance position and dimension.
Resizing a Gadget
To resize a Gadget
-
Right click the gadget you want to edit. It will now have a purple box around it.
-
Select move/resize. no grid is the easiest option.
-
The box will now have a blue box around it.
-
Mouse over the edge you want to resize, (much the same as a text box in word) click and drag th edge until the Gadget is to your liking.
-
Right click the gadget mouse over save position & dimensions and select save instance position and dimension.
Editing Gadget Properties
If you want to change the properties of a gadget that is over multiple pages or the properties of a Gadget only on one page you can now do that easily.
If you ‘edit instance value’ this will change the Gadget properties across all pages that have the Gadget displayed.
If you edit the ‘page value’ this will only change the Gadget properties on the page you are editing on.
To edit properties of a content Gadget
-
Right click the gadget you want to edit. It will now have a purple box around it.
-
Mouse over 'Edit' and select instance value (for all pages to change) or select page value (for only the page you are on to change)
-
You will now have a second tool box display
-
You can now edit how that Gadget looks like for example;
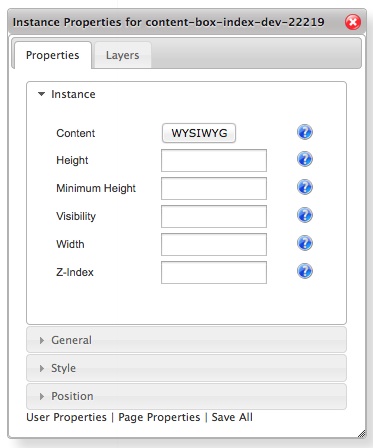
Some of the options under Instance are.
-
Height: Sets the height of the Gadget or maximum height of the gadget
-
Min Height; the Gadget will automatically grow depending on what content or image is in the gadget. Please note at least one of the height boxes needs to have details in it
-
Width: sets the width of the Gadget
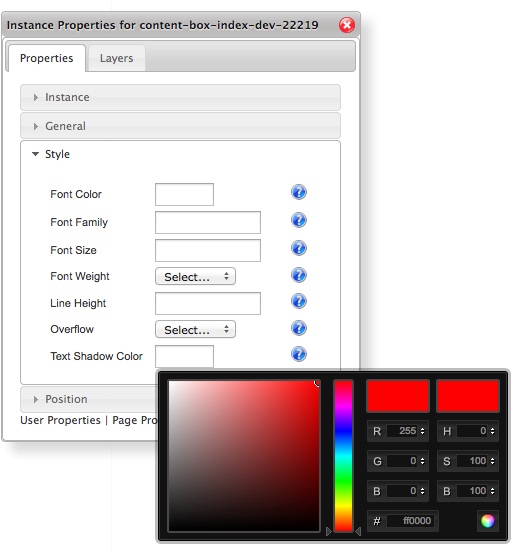
Some of the options under Style are
-
Font colour: sets the colour of the font. When you click in the box a colour wheel will show for you to select the colour you want to use
-
Font size: sets the size of the font.
-
Text shadow colour: This option creates a drop shadow on the text.
Some of the options under Position are
-
Left: sets how far in from the left of the start of the content area the Gadget will sit
-
Top: sets how far down from the top of the content area the Gadget will sit
To edit properties of an image Gadget
The image Gadget has much the same function and options as the content Gadget with these added features
-
Link – the ability to link to a page
-
Reflection – shows the Gadgets 'reflection' underneath it.